Showing posts with label dessert. Show all posts

Tuesday, October 25, 2011


vanilla cinnamon circles

Tuesday, October 25, 2011
I have started using baked goods as a way to bribe people at work into getting things done.  I promised that I would bring in something today if all requirements were met by the end of the day on Friday.  The promise of food seems to kick people into action, and I poked through my cookbooks to find something to bring in.  I found a recipe in one of my cookbooks that had minimal ingredients, most of which I had already.  Vanilla cinnamon circles seemed simple and tasty.  All I needed to buy was unsalted butter.

Sometimes things do not go as planned.  I had a feeling that something would go wrong with these cookies.  The recipe just seemed too simple.  Too easy.  I purchased a 79cent bag of brownie mix as a backup just in case something happened.

I doubled the recipe because the dough only made 25 cookies.  Maybe that was my mistake?  Once I mixed up the dough, I could tell right away that something was going to be wrong about these cookies.  I continued to follow the directions to the best of my abilities, with the dough crumbling apart as I was trying to roll it into a ball.  I shoved it in the oven and hoped for the best.

I ended up not with 25 cookies, but with a cookie sheet sized crunchy mess.  My apartment smelled delicious, though.

And delicious brownies were had by all at work.

Vanilla Cinnamon Circles
adapted from: Indulgence: Cookies


  • 3 1/2 tbsp unsalted butter, softened
  • 1/3 c superfine sugar
  • 1/2 tsp vanilla extract
  • 2/3 c flour
  • 1 tbsp milk
  • 2 tbsp sugar (extra)
  • 1/2 tsp ground cinnamon
Directions:
  1. Preheat oven to 350 degrees.  Line two cookie sheets with parchment paper.
  2. Cream the butter and sugar in a medium-sized bowl using electric beaters until pale and fluffy, then stir in vanilla.  Sift in the flour and add the milk.  Stir with a wooden spoon to form a soft dough, gather into a ball and place on a sheet of parchment paper.
  3. Press the dough out into a log shape, 10 inches long and 1 1/4 inches thick.  Roll in the paper and twist the ends to seal.  Refrigerate for 20 minutes or until firm.
  4. Cut the log into rounds 1/2 inch thick.  Sift the extra sugar and cinnamon onto a plate and roll each cookie in the sugar mixture, coating well.  Lay well apart on the sheets and bake for 20 minutes, or until edges are lightly browned.  Allow to cool for a few minutes, then transfer to a wire rack.

Let's pretend they looked like this:


Saturday, September 17, 2011


lemon picnic cake

Saturday, September 17, 2011
Summer is winding down; temperatures have dropped dramatically literally overnight, leaves are starting to fall, and I am getting back into the cooking/baking mood.  This is good news for my blog; probably not so good news for my waistline.  I had just finished reading The Particular Sadness of Lemon Cake and it inspired me to make a lemon cake as one last hurrah for summertime.


This cake is more of an understated lemon cake rather than having in-your-face flavor like your average lemon box mix.  The batter only has a hint of lemon (creating more of a pound cake flavor) and most of the zing lives in the glaze.


Lemon Picnic Cake
recipe adapted from Mom


Cake Ingredients:
  • 4 large eggs, separated
  • 2 cups sugar
  • 1 cup butter, softened
  • 3 cups all-purpose flour
  • 2 teaspoons baking powder
  • 1 cup milk (I used skim)
  • 2 teaspoons grated lemon peel
  • 1 tablespoon lemon juice
  • 1 tablespoon vanilla extract

Glaze Ingredients:
  • 1/3 cup sugar
  • 2/3 cup lemon juice
  • 1 tablespoon grated lemon peel

Directions:
  1. Heat oven to 350. Separate egg whites into small bowl.  Beat egg whites at high speed, scraping bowl often, just until stiff peaks form, 2-3 minutes. Set aside.
  2. Combine the 2 cups sugar and 1 cup butter, beat at medium speed until creamy. Add egg yolks, continue beating until creamy.   
  3. Mix together the flour and baking powder, reduce speed to low and gradually adding flour mixture alternately with milk to butter mixture, until well blended. Add lemon peel, lemon juice and vanilla.  
  4. Continue beating until well mixed.  By hand gently, fold in the egg whites.   
  5. Pour batter into greased and floured 12 cup bundt or 10 inch tube pan. Bake for 50-65 minutes or until toothpick inserted in center comes out clean.
   
For glaze:
In a 1 quart saucepan stir together all glaze ingredients. Cook over medium heat, stirring occasionally, until sugar is dissolved, about 3-4 minutes.   With chopstick, poke holes in top of cake; pour glaze over cake, letting glaze seep down into the cake through the holes.  Cool 15 minutes, remove from pan.


Sunday, September 4, 2011


blackberry cobbler

Sunday, September 4, 2011
I had two goals for the summer: ride the swan boats in Boston Common, and make a pie.  To the surprise of no one, I have not accomplished either one of those goals.  I guess I technically have until September 23rd (the first day of autumn), but the outlook isn't good.  I see it being much more likely that I'll end up making an apple pie once apple picking season starts.  I've also been trying to go to the swan boats for the past five years and I just never quite make it there.  C'est la vie.

While my pie baking goal sucked a big one, I did manage to make a cobbler!  This was both the first cobbler I had ever made and the first cobbler I had ever eaten.  I know.

A couple of years ago I went to Maine with T. and his family.  On the way to their summer house (mmhm, I hate them, too) we stopped at a little roadside shack and purchased a blackberry pie from a little old lady.  I was in love.  I ate that pie for breakfast the next morning with a small scoop of vanilla ice cream.  I've been dreaming of it ever since.


I decided that I'd try my hand at making something with blackberries while they were still on sale.  I purchased some, let them mold on my kitchen table, and then bought more.  All in all, this stupid cobbler cost me about $20.  I was determined.

Blackberry Cobbler
recipe adapted from Simply Recipes

Berry mixture:
  • 4 cups blackberries, rinsed clean
  • 1/2 cup sugar (less or more to taste, depends on how sweet the berries are and how sweet you would like your cobbler to be)
  • 1 tsp lemon juice *
  • 1/4 teaspoon cinnamon
  • 1 1/2 Tbsp cornstarch (for thickening)
* I found that it was much too sour with the lemon zest and lemon juice, so I would reduce the amount of lemon juice involved.

Cobbler topping:
  • 3 Tbsp sugar
  • 1 cup all purpose flour
  • 1 1/2 teaspoon baking powder
  • 1/4 teaspoon salt
  • 4 Tbsp butter
  • 1/4 cup milk
  • 1 egg, lightly beaten
Place berries, sugar, lemon juice, cinnamon, and cornstarch in a 9x9 casserole dish. Stir to coat the berries evenly with the sugar. Let sit for 30 minutes.

Preheat oven to 350°F. In a medium sized bowl, whisk together 3 tablespoons of sugar, the flour, baking powder, and salt. Cut the butter in with a pastry blender or fork (or even your fingers) until the mixture resembles coarse crumbs. Use a wooden spoon to stir in the egg and milk until the batter is just moistened.

Taking large spoonfuls, drop the batter mixture over the berries. Place in the oven and bake for 30 minutes or until the berry mixture is bubbly and the topping is nicely browned.


Thursday, July 7, 2011


mint birthday cake

Thursday, July 7, 2011
Well, I'm all moved in and as settled into my new apartment as I am going to get.  The kitchen is a lot bigger, but I haven't really taken much advantage of it since moving in.  I'm still eating mostly cereals and pastas because I am terrible.

I did, however, get my act together enough to whip up a special birthday cake.  The birthday boy in question is fond of chocolate and mint, so I scoured the internet to try to find a mint chocolate cake.  I never really found anything that was close to what I was looking for, so I combined several recipes into one to suit my needs.

I wasn't quite ready to try my hand at making a cake from scratch, so I went looking for a boxed chocolate cake mix.  I ended up with Devil's Food because stores don't seem to sell just "chocolate cake" mix any longer.  I think in the future, I would pick something that was more chocolatey, like chocolate fudge cake.

I followed the directions on the box and made two round nine inch layers.  During the mixing process, I added a tiny bit (maybe half a teaspoon) of peppermint extract because I was worried that the frosting wouldn't be minty enough, but this turned out to be unnecessary and I would actually advise against it, especially if using the devil's food flavored cake.  It wasn't bad tasting, I just think it would have been better and more subtle without the extra mint flavoring.

To go between the two layers, I made my own mint frosting.

Mint Frosting
- 1 stick of butter (8 tablespoons), softened
- 2 cups confectioner's sugar
- 1 teaspoon peppermint extract
- 1 tablespoon water *

Mix all ingredients in a bowl and beat until whipped and fluffy.
* I found that 1 tablespoon of water was not nearly enough and butter/sugar was flying everywhere when I was using my hand mixer.  I poured in more water until it softened everything up and created a frosting-like consistency while I was blending.


After spreading that on top of the bottom layer, I placed the top layer on it and used a serrated knife to level the cake.  I chose just a plain chocolate frosting to go over the cake and then decorated it with some white piping.  It wasn't quite as tasty as a thin mint, but it was well-received and a good starting point if I wanted to improve upon the recipe in the future.


I ended up having to freeze a good portion of this cake.  I cut into slices, put each slice in the freezer for about 10-15 minutes or just long enough to harden the frosting, and then wrapped each slice first in plastic wrap and then aluminum foil before throwing them in a Zip-Lock bag.  Here's hoping it keeps well.

Tuesday, May 10, 2011


betty crocker

Tuesday, May 10, 2011
I mostly save my cake eating for birthdays.  Occasionally, I will bake cupcakes.  I bought cake tins a few years ago and, like most of my kitchen gadgets, have only been used two or three times.  Mostly for birthdays and once for those Pillsbury cinnamon buns that come in the vacuum-sealed tube.  Like my favorite homemade coffee cake, I seem to only feel comfortable making and eating cake for some sort of holiday or celebration.  Sometimes, however, I just feel like eating a cake.


I am not yet as skilled (read: motivated) as to bake a cake from scratch and Betty Crocker cake mix was on sale at Target for $1.  I bought a gold cake mix and a tub of chocolate frosting (a departure from my usual buttercream/cream cheese frosting fixation).  I made a point not to buy the whipped frosting, as it is the same price for frosting that has been injected and whipped with air.  So far, everything is going smoothly.


Once home, I place the ingredients and all needed out on my butcher block.  I set out my cake pans and poured the cake batter into them.  So far, so good.  I run into a little trouble when I realize both cake tins can't fit completely flat in my miniature oven, but that's okay.  I make do.  My kitchen timer goes off and I take the pans out of the oven to cool.  Everything looks fine.  After a while, I remember that I have cake cooking and try to get them out of the pans.

I was fooled by Wilson's.  Non-stick nonsense.  I run a knife along the edges and assume the cakes will flop out like usual.  Instead, the cake does not budge.  I slide my hands gently under the cakes, prying them away from the bottom of the pans.  The first one crumbles, but I figure I will just stick that one at the bottom and we'll be none the wiser.  We'll just cover that bad boy in frosting.

I take the frosting from the shopping bag and am alarmed at how light the canister is.  I take a look at the label.  Whipped!  How did that happen?!  I angrily throw it in the microwave and smear it cover my broken cake bits.  Now comes the top layer.

 This doesn't go much better.  I think this picture pretty much sums it up:


I try to patch it up by using frosting as an adhesive.  It looks kind of okay at this point.  I go to cut a piece later in the evening and the entire thing crumbles to bits.


Just so this entry isn't so depressing; here's a completely normal looking cake that my sister made for my dad's birthday:

Friday, November 26, 2010


belated egg nog cake

Friday, November 26, 2010
I am terribly late writing this entry, as I did not particularly care for the cake nor do I feel particularly strongly about egg nog.  I should have seen this apathy coming when I decided to make an egg nog dessert outside of the holiday season.  I love the holidays.  I have created very rigid guidelines about when I can start to enjoy myself about Christmas, otherwise my apartment would be filled with pine boughs all year round and I'd be listening to nothing but Christmas music.  Because that certainly does not happen.

I have been met with a lot of questioning when I have told people about how I made this cake coupled with the fact that I do not like egg nog.  For the record, I made it for someone who does, in fact, like egg nog.  This person has stared longingly at the egg nog in the refrigerated section of the grocery store since it arrived in mid-November (not egg nog season, thank you) and has put up with my scorn for his lack of holiday willpower.  I'm a terrible girlfriend.  To make up for this, I bought egg nog and decided to turn it into a cake.  This also allowed the extra egg nog to be sent home with him at no extra charge.  I am the best girlfriend.

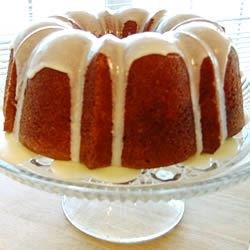
As with all of the recipes that I find, I took a little artistic liberty.  All of the pictures on the website where I got it had it drizzled with custard and nicely shaped.  I drove all over town looking for a bundt pan to no avail, so mine was just a circular blob of cake.  I also didn't know how I felt about custard, so I made my own glaze that I poured over each slice.  I tried sprucing the cake up with some red sprinkles, but they just turned the cake pink over time.  The picture that you see to the left is not my cake, but this is what I want you to imagine my cake looked like.  Pretend it tasted good, too.


Egg Nog Cake
adapted from Allrecipes.com

  • 1 (18.25 ounce) package yellow cake mix (I used butter cake, this may have been a mistake)
  • 2 cups egg nog
  • 2 eggs
  • 1/2 cup butter or margarine, softened
  • 1/2 teaspoon ground nutmeg
In a mixing bowl, combine the first five ingredients. Beat on low until moistened, scraping bowl occasionally. Beat on medium for 2 minutes. Pour into a greased and floured 12-cup fluted tube pan. Bake at 350 degrees F for 40-45 minutes or until a toothpick inserted near the center comes out clean. Cool in pan for 10 minutes; invert onto a wire rack. Remove from pan; cool completely. 

For glaze, combine egg nog with confectioners sugar and a dash of vanilla extract.  Mix with fork until smooth.  Pour over cake if you like mushy cake, as this is not actually a glaze.