Showing posts with label baking. Show all posts

Thursday, May 24, 2012


red velvet crinkle cookies

Thursday, May 24, 2012

I tried a new recipe a few weeks ago and made red velvet crinkle cookies for a friend's birthday.  I took the extras to a friend's apartment for ladies night, and they were a huge hit.


Saturday, March 17, 2012


St. Patrick's Day

Saturday, March 17, 2012

I celebrated St. Patrick's day last week by bringing in cake truffles to work.  At some point, I had purchased shamrock sprinkles on a whim and figured it was probably a wise idea to put them to use, as they can only be used once a year.  I went with cake truffles this time instead of cake pops, as I find putting them on the sticks and dipping the balls of cake in the melted chocolate (hoping that they don't fall in) to be rather tedious.  Placing them in tiny truffle papers makes them look a little classier, in my opinion.  Either way, they were a big hit at work.


I started out with a vanilla/white cake base and added some green food coloring to it for a little holiday surprise.  I mixed the cake with some leftover Funfetti frosting I had in the fridge (this accounts for the multicolored specks that you see in the picture above).  Once the cake balls were formed, I put them in the fridge for a little bit to harden up.  Afterwards, I dipped each ball into some melted white chocolate.  I accidentally thinned the chocolate too much, so the green cake was sort of visible through the candy coating.  Once coated, I sprinkled with green and set them aside to harden up.


Wednesday, January 18, 2012


shortbread buttons

Wednesday, January 18, 2012
I've been trying out some new recipes on my coworkers and last week's big hit was shortbread buttons!  You can check out the listing in the Etsy shop.

I learned a lot by making these; namely, do not touch food coloring with your bare hands or you will look like you have some bizarre mottled blue and red skin disease.  Also, if you handle shortbread dough for too long and don't refridgerate it for long enough, it will be melty and pretty much impossible to cut into shapes and get on the cookie sheet/off the spatula.  I was forced to eat many deformed red buttons, as I did not want to give a bad impression at work.  Shucks.

I adopted an abandoned standmixer from my parents' house when I was visiting during the holidays.  The mixer had been banished to the basement after being upgraded to a Kitchen-Aid mixer.  I gave 'er a good wipe down and transported it back to my apartment.  Up until now, I have been using an ancient hand mixer that would get very warm during prolonged usage and smelled suspiciously like burning rubber after you turned it off.  The stand mixer has pretty much changed my baking life.  No longer am I (or my walls) covered in flying bits of butter, my hand doesn't get tired, and I'm not fighting with my vintage Pyrex bowls with the too-shallow sides.  It's really a miracle how much has changed in my process.  Definitely upgrade; thanks, Mom.


Friday, December 30, 2011


Friday, December 30, 2011

I will now be offerring homemade baked goods for sale in the shop!

Thursday, December 1, 2011


peppermint sugar cookies

Thursday, December 1, 2011
I am alive and full of cookies.  I started right away on my cookie baking once I returned to my apartment after Thanksgiving.  This was the first round.

Ingredients:
  • 1 c. butter, softened
  • 3/4 c. sugar
  • 1 egg
  • 3 c. all purpose flour
  • 1/4 tsp. salt
  • 1/2 c. crushed candy canes or peppermint candies
  • 5 tsp. warm water
  • 3/4 c. confectioners' sugar
Directions:
Heat oven to 350°F. In medium bowl, beat butter and sugar until light and creamy. Add egg and beat until blended. Stir in flour and salt, then the crushed candy.  Roll 1 tablespoon of dough into ball. Place on ungreased cookie sheet. Bake cookies 8 to 10 minutes until firm. Cool on sheet for 1 minute. Transfer to wire rack to finish cooling. 

Picture from We Are Not Martha
 

Tuesday, October 25, 2011


vanilla cinnamon circles

Tuesday, October 25, 2011
I have started using baked goods as a way to bribe people at work into getting things done.  I promised that I would bring in something today if all requirements were met by the end of the day on Friday.  The promise of food seems to kick people into action, and I poked through my cookbooks to find something to bring in.  I found a recipe in one of my cookbooks that had minimal ingredients, most of which I had already.  Vanilla cinnamon circles seemed simple and tasty.  All I needed to buy was unsalted butter.

Sometimes things do not go as planned.  I had a feeling that something would go wrong with these cookies.  The recipe just seemed too simple.  Too easy.  I purchased a 79cent bag of brownie mix as a backup just in case something happened.

I doubled the recipe because the dough only made 25 cookies.  Maybe that was my mistake?  Once I mixed up the dough, I could tell right away that something was going to be wrong about these cookies.  I continued to follow the directions to the best of my abilities, with the dough crumbling apart as I was trying to roll it into a ball.  I shoved it in the oven and hoped for the best.

I ended up not with 25 cookies, but with a cookie sheet sized crunchy mess.  My apartment smelled delicious, though.

And delicious brownies were had by all at work.

Vanilla Cinnamon Circles
adapted from: Indulgence: Cookies


  • 3 1/2 tbsp unsalted butter, softened
  • 1/3 c superfine sugar
  • 1/2 tsp vanilla extract
  • 2/3 c flour
  • 1 tbsp milk
  • 2 tbsp sugar (extra)
  • 1/2 tsp ground cinnamon
Directions:
  1. Preheat oven to 350 degrees.  Line two cookie sheets with parchment paper.
  2. Cream the butter and sugar in a medium-sized bowl using electric beaters until pale and fluffy, then stir in vanilla.  Sift in the flour and add the milk.  Stir with a wooden spoon to form a soft dough, gather into a ball and place on a sheet of parchment paper.
  3. Press the dough out into a log shape, 10 inches long and 1 1/4 inches thick.  Roll in the paper and twist the ends to seal.  Refrigerate for 20 minutes or until firm.
  4. Cut the log into rounds 1/2 inch thick.  Sift the extra sugar and cinnamon onto a plate and roll each cookie in the sugar mixture, coating well.  Lay well apart on the sheets and bake for 20 minutes, or until edges are lightly browned.  Allow to cool for a few minutes, then transfer to a wire rack.

Let's pretend they looked like this:


Thursday, October 13, 2011


toffee cakes

Thursday, October 13, 2011
With my extra day off this weekend, I decided to do some baking.  As I've already starting checking out Christmas craft/cookbooks from the library to find tasty recipes, I'm starting to amass more than I will realistically be able to bake between Thanksgiving and Christmas.  To avoid the Christmas cookie sweatshop that was my last Christmas season, I've started my baking now.  I've been bringing the extras to work with me to share with my coworkers (yes, I could eat 45 cookies but I probably shouldn't).  These didn't get me any rave email replies, but I thought they were pretty tasty.

Toffee Cakes
from: Better Homes & Gardens Christmas Comfort & Joy


Ingredients

3/4 c butter
1/3 c sugar
1 tbsp milk
2 tsp vanilla
2 3/4 c flour
1/2 c chocolate covered toffee pieces

For Chocolate Drizzle:
  1/2 c chocolate chips
  2 tsp butter


Directions
1. Beat butter and sugar together.  Add milk & vanilla, continue to beat.  Add flour slowly.  Stir in toffee pieces and mi dough with hands until flour blends.

2. Cover and chill for 1 hour.

3. Preheat oven to 325.  Shape dough into 1” balls.  Bake for 15-20 minutes or until slightly browned.
4. Combine chocolate & butter in a saucepan to melt.  Drizzle over cookies.

I attempted to drizzle chocolate over mine, but I ended up wasting almost an entire bag of chocolate chips on the endeavor.  Apparently if there is any moisture in your saucepan, your chocolate will seize up and turn into chocolate frosting.  Make sure you don't do that. 


Wednesday, October 5, 2011


vanilla pumpkin bread

Wednesday, October 5, 2011
See you later, summer.  The weather has finally gotten cooler here in Boston and I celebrated the passing of summer by baking two loaves of pumpkin bread (one for me, one for my coworkers at the office).  I'm fairly indifferent towards pumpkin as a flavoring, but it seemed like something quick I could whip up that would leave my apartment warm and smelling good.  Both of these things are true.  The pudding keeps this bread extra moist, and adds a hint of vanilla flavoring.


Vanilla Pumpkin Bread


Ingredients:
  • 5 eggs 
  • 1 1/4 cups vegetable oil 
  • 1 can (15 oz.) pumpkin 
  • 2 cups all-purpose flour 
  • 2 cups sugar 
  • 2 pkgs. (3 oz. each) cook-and-serve vanilla pudding mix 
  • 1 tsp. baking soda 
  • 1 tsp. ground cinnamon 
  • 1/2 tsp. salt 

  1. Preheat oven to 325 degrees. 
  2. In a mixing bowl, beat the eggs. Add oil and pumpkin; beat until smooth. 
  3. Combine remaining ingredients; gradually beat into pumpkin mixture. 
  4. Pour batter into 2 greased 8 x 4 x 2" loaf pans for 75-80 minutes OR 5 greased 5 x 2.5 x 2" inch loaf pans for 50-55 minutes / until a toothpick inserted near the center comes out clean.
  5.  Cool for 10 minutes; remove from pans to wire racks to cool completely.

Saturday, September 17, 2011


lemon picnic cake

Saturday, September 17, 2011
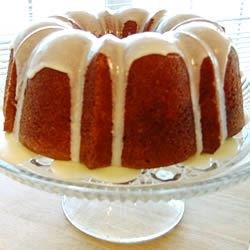
Summer is winding down; temperatures have dropped dramatically literally overnight, leaves are starting to fall, and I am getting back into the cooking/baking mood.  This is good news for my blog; probably not so good news for my waistline.  I had just finished reading The Particular Sadness of Lemon Cake and it inspired me to make a lemon cake as one last hurrah for summertime.


This cake is more of an understated lemon cake rather than having in-your-face flavor like your average lemon box mix.  The batter only has a hint of lemon (creating more of a pound cake flavor) and most of the zing lives in the glaze.


Lemon Picnic Cake
recipe adapted from Mom


Cake Ingredients:
  • 4 large eggs, separated
  • 2 cups sugar
  • 1 cup butter, softened
  • 3 cups all-purpose flour
  • 2 teaspoons baking powder
  • 1 cup milk (I used skim)
  • 2 teaspoons grated lemon peel
  • 1 tablespoon lemon juice
  • 1 tablespoon vanilla extract

Glaze Ingredients:
  • 1/3 cup sugar
  • 2/3 cup lemon juice
  • 1 tablespoon grated lemon peel

Directions:
  1. Heat oven to 350. Separate egg whites into small bowl.  Beat egg whites at high speed, scraping bowl often, just until stiff peaks form, 2-3 minutes. Set aside.
  2. Combine the 2 cups sugar and 1 cup butter, beat at medium speed until creamy. Add egg yolks, continue beating until creamy.   
  3. Mix together the flour and baking powder, reduce speed to low and gradually adding flour mixture alternately with milk to butter mixture, until well blended. Add lemon peel, lemon juice and vanilla.  
  4. Continue beating until well mixed.  By hand gently, fold in the egg whites.   
  5. Pour batter into greased and floured 12 cup bundt or 10 inch tube pan. Bake for 50-65 minutes or until toothpick inserted in center comes out clean.
   
For glaze:
In a 1 quart saucepan stir together all glaze ingredients. Cook over medium heat, stirring occasionally, until sugar is dissolved, about 3-4 minutes.   With chopstick, poke holes in top of cake; pour glaze over cake, letting glaze seep down into the cake through the holes.  Cool 15 minutes, remove from pan.


Sunday, September 4, 2011


blackberry cobbler

Sunday, September 4, 2011
I had two goals for the summer: ride the swan boats in Boston Common, and make a pie.  To the surprise of no one, I have not accomplished either one of those goals.  I guess I technically have until September 23rd (the first day of autumn), but the outlook isn't good.  I see it being much more likely that I'll end up making an apple pie once apple picking season starts.  I've also been trying to go to the swan boats for the past five years and I just never quite make it there.  C'est la vie.

While my pie baking goal sucked a big one, I did manage to make a cobbler!  This was both the first cobbler I had ever made and the first cobbler I had ever eaten.  I know.

A couple of years ago I went to Maine with T. and his family.  On the way to their summer house (mmhm, I hate them, too) we stopped at a little roadside shack and purchased a blackberry pie from a little old lady.  I was in love.  I ate that pie for breakfast the next morning with a small scoop of vanilla ice cream.  I've been dreaming of it ever since.


I decided that I'd try my hand at making something with blackberries while they were still on sale.  I purchased some, let them mold on my kitchen table, and then bought more.  All in all, this stupid cobbler cost me about $20.  I was determined.

Blackberry Cobbler
recipe adapted from Simply Recipes

Berry mixture:
  • 4 cups blackberries, rinsed clean
  • 1/2 cup sugar (less or more to taste, depends on how sweet the berries are and how sweet you would like your cobbler to be)
  • 1 tsp lemon juice *
  • 1/4 teaspoon cinnamon
  • 1 1/2 Tbsp cornstarch (for thickening)
* I found that it was much too sour with the lemon zest and lemon juice, so I would reduce the amount of lemon juice involved.

Cobbler topping:
  • 3 Tbsp sugar
  • 1 cup all purpose flour
  • 1 1/2 teaspoon baking powder
  • 1/4 teaspoon salt
  • 4 Tbsp butter
  • 1/4 cup milk
  • 1 egg, lightly beaten
Place berries, sugar, lemon juice, cinnamon, and cornstarch in a 9x9 casserole dish. Stir to coat the berries evenly with the sugar. Let sit for 30 minutes.

Preheat oven to 350°F. In a medium sized bowl, whisk together 3 tablespoons of sugar, the flour, baking powder, and salt. Cut the butter in with a pastry blender or fork (or even your fingers) until the mixture resembles coarse crumbs. Use a wooden spoon to stir in the egg and milk until the batter is just moistened.

Taking large spoonfuls, drop the batter mixture over the berries. Place in the oven and bake for 30 minutes or until the berry mixture is bubbly and the topping is nicely browned.


Thursday, July 7, 2011


mint birthday cake

Thursday, July 7, 2011
Well, I'm all moved in and as settled into my new apartment as I am going to get.  The kitchen is a lot bigger, but I haven't really taken much advantage of it since moving in.  I'm still eating mostly cereals and pastas because I am terrible.

I did, however, get my act together enough to whip up a special birthday cake.  The birthday boy in question is fond of chocolate and mint, so I scoured the internet to try to find a mint chocolate cake.  I never really found anything that was close to what I was looking for, so I combined several recipes into one to suit my needs.

I wasn't quite ready to try my hand at making a cake from scratch, so I went looking for a boxed chocolate cake mix.  I ended up with Devil's Food because stores don't seem to sell just "chocolate cake" mix any longer.  I think in the future, I would pick something that was more chocolatey, like chocolate fudge cake.

I followed the directions on the box and made two round nine inch layers.  During the mixing process, I added a tiny bit (maybe half a teaspoon) of peppermint extract because I was worried that the frosting wouldn't be minty enough, but this turned out to be unnecessary and I would actually advise against it, especially if using the devil's food flavored cake.  It wasn't bad tasting, I just think it would have been better and more subtle without the extra mint flavoring.

To go between the two layers, I made my own mint frosting.

Mint Frosting
- 1 stick of butter (8 tablespoons), softened
- 2 cups confectioner's sugar
- 1 teaspoon peppermint extract
- 1 tablespoon water *

Mix all ingredients in a bowl and beat until whipped and fluffy.
* I found that 1 tablespoon of water was not nearly enough and butter/sugar was flying everywhere when I was using my hand mixer.  I poured in more water until it softened everything up and created a frosting-like consistency while I was blending.


After spreading that on top of the bottom layer, I placed the top layer on it and used a serrated knife to level the cake.  I chose just a plain chocolate frosting to go over the cake and then decorated it with some white piping.  It wasn't quite as tasty as a thin mint, but it was well-received and a good starting point if I wanted to improve upon the recipe in the future.


I ended up having to freeze a good portion of this cake.  I cut into slices, put each slice in the freezer for about 10-15 minutes or just long enough to harden the frosting, and then wrapped each slice first in plastic wrap and then aluminum foil before throwing them in a Zip-Lock bag.  Here's hoping it keeps well.

Tuesday, May 10, 2011


betty crocker

Tuesday, May 10, 2011
I mostly save my cake eating for birthdays.  Occasionally, I will bake cupcakes.  I bought cake tins a few years ago and, like most of my kitchen gadgets, have only been used two or three times.  Mostly for birthdays and once for those Pillsbury cinnamon buns that come in the vacuum-sealed tube.  Like my favorite homemade coffee cake, I seem to only feel comfortable making and eating cake for some sort of holiday or celebration.  Sometimes, however, I just feel like eating a cake.


I am not yet as skilled (read: motivated) as to bake a cake from scratch and Betty Crocker cake mix was on sale at Target for $1.  I bought a gold cake mix and a tub of chocolate frosting (a departure from my usual buttercream/cream cheese frosting fixation).  I made a point not to buy the whipped frosting, as it is the same price for frosting that has been injected and whipped with air.  So far, everything is going smoothly.


Once home, I place the ingredients and all needed out on my butcher block.  I set out my cake pans and poured the cake batter into them.  So far, so good.  I run into a little trouble when I realize both cake tins can't fit completely flat in my miniature oven, but that's okay.  I make do.  My kitchen timer goes off and I take the pans out of the oven to cool.  Everything looks fine.  After a while, I remember that I have cake cooking and try to get them out of the pans.

I was fooled by Wilson's.  Non-stick nonsense.  I run a knife along the edges and assume the cakes will flop out like usual.  Instead, the cake does not budge.  I slide my hands gently under the cakes, prying them away from the bottom of the pans.  The first one crumbles, but I figure I will just stick that one at the bottom and we'll be none the wiser.  We'll just cover that bad boy in frosting.

I take the frosting from the shopping bag and am alarmed at how light the canister is.  I take a look at the label.  Whipped!  How did that happen?!  I angrily throw it in the microwave and smear it cover my broken cake bits.  Now comes the top layer.

 This doesn't go much better.  I think this picture pretty much sums it up:


I try to patch it up by using frosting as an adhesive.  It looks kind of okay at this point.  I go to cut a piece later in the evening and the entire thing crumbles to bits.


Just so this entry isn't so depressing; here's a completely normal looking cake that my sister made for my dad's birthday:

Sunday, March 27, 2011


road cookies

Sunday, March 27, 2011
It has only been relatively recently that I have realized that I have had a latent interest in using cooking to show affection.  I have never really had much interest in cooking or baking up until this past year (and even now I'm not entirely sure how much of this "interest" I have is based on anything other than having something to do), but being able to have some sort of tangible evidence of my affection and effort I have put into making something for someone else is satisfying.  Sharing my baking with others also has some other nice selfish benefits: I don't have to eat 72 cookies myself (and gain 400 pounds), I get to try new recipes I wouldn't otherwise make, and it gives me something to spend my ample free time on.

I wanted to make cookies that could be given as a gift and transported across many state lines.  The plan was to use my stand-by recipe for chocolate chip cookies adopted from my mother (using vanilla pudding mix in the dough to make them extra moist).  However, scheduling issues arose and it turned out that the cookies needed to be baked much sooner than I thought.  I came home on Thursday with the realization that I both did not have vanilla pudding and that my brown sugar was in the form of a brick and still I had not found out how to soften it without turning it into mush or bought new sugar.  I considered giving up and just buying cookies at the store.  The sentiment would still be the same, but it always feels cheap to me to cop out and not put forth the effort to actually make something for someone.

Google to the rescue.  I figured that it would be a lost cause, but I did a quick search for "chocolate chip cookies without brown sugar."  I wasn't expecting any results.  As far as I was concerned, brown sugar and butter were pretty much the foundation for chocolate chip cookies and anything else would be a poor substitute.  I warily printed out a recipe that called for honey instead of brown sugar and decided it wouldn't hurt to give it a try.

So I did.  The dough formed and everything seemed to go fine, but the cookies spread out like crazy during baking.  I'm sure some more experienced baker would be able to point out something I could have added to make them more firm, but alas.  I used my spatula to break them into smaller cookies, all the while assuming I would have to throw away the entire batch.


Like most things I make, these things look pretty questionable but they taste fine.  The honey adds an interesting extra layer of flavor, and while I don't think that I'd make these every time, they are an excellent substitute for the more traditional brown sugar based cookies.

No Brown Sugar Chocolate Chip Cookies
recipe from Spark Recipes

Ingredients
•    2 1/2 cups all-purose flour

•    2 eggs

•    1 teaspoon vanilla extract

•    3/4 teaspoon salt

•    1 teaspoon baking soda

•    6 ounces chocolate chips (I used a combination of milk & semisweet)
•    1 cup white sugar

•    2 tablespoons honey

•    1 1/4 cups butter

Preheat oven to 375 degrees F.


Cream the butter with the sugar and the honey.
Stir in the eggs and vanilla.
Add the flour and baking soda.
Stir in chocolate chips.


Place teaspoon sized dough about 2 inches apart on an ungreased baking sheet.


Bake at 375 degrees F for 10 minutes or until golden brown.


Saturday, January 15, 2011


banana bread

Saturday, January 15, 2011
I've made a lot of lousy loaves of banana bread.  It took me several years to get a good recipe under my belt and I think that for a while I was afraid of bananas.  My early loaves were always too dry and then there was that unfortunate chunk of time where I stopped measuring everything and routinely added too much baking soda to all baked goods and wondered why my cookies and breads left my mouth tasting like burning.  Then there was that other unfortunate time where I thought I wanted to eat healthier and used nothing but whole wheat flour, bran, and applesauce to bake with.  In case you were wondering, everything I made during that time period tasted like sticks.

It turned out okay, though.  I buy bananas now for the sole purpose of letting them rot on my kitchen counter and throw them into the freezer for later.  I realized that adding more bananas would alleviate the dryness and using actual sugar wouldn't kill me (and neither would my impending diabetes, hopefully).  I don't even burn myself anymore!


Banana Bread
Makes 2 loaves


Ingredients

  • 1 cup all-purpose flour
  • 1 cup whole wheal flour (old habits die hard)
  • 1 teaspoon baking soda (it is important to measure this)
  • 1/4 teaspoon salt
  • 1/2 cup butter
  • 3/4 cup brown sugar
  • 2 eggs, beaten
  • 6-7 overripe bananas, mashed

Directions

  1. Preheat oven to 350 degrees F (175 degrees C). Lightly grease two loaf pans.
  2. In a large bowl, combine flour, baking soda and salt. In a separate bowl, cream together butter and brown sugar. Stir in eggs and mashed bananas until well blended. Stir banana mixture into flour mixture; stir just to moisten*. Pour batter into prepared loaf pan.
  3. Bake in preheated oven for 60 to 65 minutes, until a toothpick inserted into center of the loaf comes out clean. Let bread cool in pan for 10 minutes, then turn out onto a wire rack.
* At this point you can either keep the recipe as is, or add some nuts or chocolate chips.  I know this is starting to feel like a round of Cooking Mama.  Sorry.  This time around, I opted for one plain loaf and one chocolate chip loaf.

Tuesday, January 4, 2011


peppermint bark

Tuesday, January 4, 2011
My blog readership has doubled since my last entry!  I hope y'all (all four of you) had a wonderful holiday.  I'm still getting caught up on Christmas recipes, so bear with me.  I probably should have done this sooner as I had over a week off from work, but I was too busy wallowing in a bed full of post-Christmas malaise.  Life is tough, guys.

I had made peppermint bark the year before and recalled it being a pretty simple recipe to make.  You get out my Pyrex dish, melt some dark chocolate, spread it around, wait for it to cool, melt some white chocolate with peppermint extract mixed it and spread it on top of the dark chocolate, crush some candy canes and sprinkle them on top.  Done.  Eat.

Of course things do not go that smoothly.  I didn't check to see how much white chocolate I had left before I started making this.  Turns out, not really enough.  I ended up having to unwrap and throw in some candy cane flavored Hershey's Kisses which turned out to be a good idea.  The white chocolate was festively pink with little flecks of candy cane inside of it already.  I was a little too stingy with the peppermint extract, as it smelled like Listerine when I opened it and I was afraid of it being too overwhelming.  Lesson learned.

Most important lesson leaned?  LINE THE GLASS DISH WITH SOMETHING.  Chocolate is really hard to get out of glass, guys.


Peppermint Bark
  • 8oz semisweet chocolate chips
  • 8oz white chocolate chips
  • 1tsp peppermint extract
  • candy canes

Directions

  1. Lightly grease a 9x9 inch pan and line with waxed paper, smoothing out wrinkles; set aside.
  2. Place the semisweet chocolate in the top of a double boiler over just barely simmering water, stirring frequently and scraping down the sides with a rubber spatula to avoid scorching. When the chocolate is melted, stir in 1/4 teaspoon of the peppermint extract. Pour the melted chocolate into the prepared pan, and spread evenly over the bottom of the pan. Refrigerate until completely hardened, about 1 hour.
  3. Place the white chocolate and the remaining 1 teaspoon canola oil in the top of a double boiler over just barely simmering water, stirring frequently and scraping down the sides with a rubber spatula to avoid scorching. When the chocolate is melted, stir in the remaining 1/4 teaspoon peppermint extract. Pour the white chocolate directly over the semisweet chocolate layer; spread evenly. Sprinkle the remaining crushed candy over the top and gently press in. Refrigerate until completely hardened. Remove from pan; break into small pieces to serve. 


Friday, December 24, 2010


white chocolate chip chocolate cookies

Friday, December 24, 2010
Image from VeryBestBaking


These are another cookie that I grew up eating every year for Christmas.  They are essentially a reverse chocolate chip cookie, with the chips being white chocolate and the cookie being chocolate flavored.  I made these when the Chocolate Crinkles had to be put in the fridge over night. Aside from that, these cookies were baked without incident, which means I have nothing amusing to tell you.  Just bake the cookies, they are delicious.


White Chocolate Chip Chocolate Cookies
Recipe from AllRecipes

Ingredients

  • 1 cup butter, softened
  • 2 cups white sugar
  • 2 eggs
  • 2 teaspoons vanilla extract
  • 2 cups all-purpose flour
  • 3/4 cup unsweetened cocoa powder
  • 1 teaspoon baking soda
  • 1/2 teaspoon salt
  • 1 2/3 cups white chocolate chips

Directions

  1. Preheat oven to 350 degrees F (175 degrees C).
  2. In a large bowl, cream together the butter and sugar until smooth. Beat in the eggs one at a time, then stir in the vanilla. Combine the flour, cocoa, baking soda and salt; stir into the creamed mixture. Fold in the white chocolate chips. Drop by rounded teaspoonfuls onto ungreased cookie sheets.
  3. Bake for 8 to 10 minutes in the preheated oven, until cookies are set. Allow cookies to cool on baking sheet for 5 minutes before removing to a wire rack to cool completely.


chocolate crinkle cookies

I felt that for the next recipe made in my Christmas cookie sweatshop, it would behoove me to try something new.  My boyfriend had expressed an interest in "chocolate crinkle cookies" and having never made nor eaten one before, I thought that it would be interesting to give it a go.  I find the powdered sugar tops to be charmingly festive and perhaps it would have added a bit of visual interest to a bag of misshapen lumps.

I started the recipe after dinner one night, having psyched myself up for making cookies.  I picked this recipe out of my pile of Potential Cookie Print-Outs and started making the dough.  I should let it be known that I do not read recipes in their entirety before I start making them.  I do a little skim to make sure I have all the necessary ingredients and cookware, but I don't go much deeper than that.  Imagine my disappointment after mixing together the dough when I realize that it must be refrigerated overnight.  I angrily put the bowl in the fridge and started on another cookie. (recipe forthcoming)

Fast forward to the next day.  I pull the dough out of the fridge and find that it has formed into a fudge-like consistency.  I dig my spoon into the mix and it bends under the pressure of my attempted scooping.  I give up after a few balls are made, choosing instead to dig my nails into the fudge and claw wildly until I have enough to form a tiny cookie.  Then the rolling.  I have to roll the dough between my hands to form a ball, the fudge melting slightly and leaving my hands a dark brown color.  It's a mess.

The balls go into a bowl of powdered sugar, where you roll them around.  At this point, there is powdered sugar everywhere in my apartment, being stuck to the trail of melted chocolate fudge from when I inevitably have to touch things.  It's a mess.  It's a mess, and I didn't even care for these cookies.

As a side note, please notice that this recipe makes FIVE DOZEN COOKIES.

Chocolate Crinkles
Adapted from King Arthur Flour

  • 1 1/3 cups (8 ounces) chopped bittersweet chocolate or chocolate chips (I used a mix of bittersweet & semisweet)
  • 1/2 cup (4 ounces, 1 stick) unsalted butter
  • 2/3 cup (4 3/4 ounces) sugar
  • 3 large eggs
  • 2 teaspoons vanilla
  • 1/2 teaspoon baking powder
  • 1/4 teaspoon salt
  • 1 2/3 cups (7 ounces) Unbleached All-Purpose Flour
  • confectioners' sugar* (for coating)

Dough: Place the chocolate and butter in a small saucepan or microwave-safe bowl, and heat or microwave till the butter melts. Remove it from the heat, and stir until the chocolate melts and the mixture is smooth.

In a separate bowl, beat together the sugar, eggs, vanilla and espresso powder. Stir in the chocolate mixture, baking powder and salt, then the flour. Chill the dough for 2 to 3 hours, or overnight; it'll firm up considerably.

Shaping: Put about a cup of confectioners' sugar into a shallow bowl. Using a teaspoon-sized cookie scoop, a spoon, or your fingers, scoop out heaping teaspoon-sized portions of the dough; they should be roughly 1 1/4 inches in diameter. Drop the dough balls into the confectioners' sugar as you go. Once about five or six are in the bowl, shake and toss the bowl to coat the balls with the sugar. (If you try to do this with too many balls at a time, they'll just stick together.)

Baking: Place the coated dough balls on a lightly greased or parchment-lined cookie sheet, leaving about 1 1/2 inches between them. Bake the cookies in a preheated 325°F oven for 10 to 12 minutes, switching the position of the pans (top to bottom, and front to back) midway through the baking time. As the cookies bake, they'll flatten out and acquire their distinctive "streaked" appearance. Remove the cookies from the oven, and allow them to cool on a wire rack. Yield: about 5 dozen 2 1/2-inch cookies.


Saturday, December 11, 2010


peanut butter blossoms

Saturday, December 11, 2010
My miniature Christmas tree has finally been decorated (as of 2am).  The presents are wrapped and underneath the tree.  I participated in my first non-denominational office holiday party/Yankee gift swap.  I've walked arm-in-arm in the flurries to catch the train.  And so begins the Christmas cookie season.

Because I now have coworkers that I can stand to be around for 7 hours a day, I thought I would make everyone little bags of cookies for the holidays.  This satisfies my desire to give people presents, bake, "taste test" cookies, and make everyone around me fatter so that I look skinnier by comparison.  With the holidays rapidly approaching and only one recipe completed out of a planned five or six, my apartment promises to be a little Christmas cookie sweatshop these next few days.

The first/only cookies I've made so far are peanut butter blossoms.  I have had these every year for Christmas for as long as I can remember, but this is only my second year doing more than just pressing the Kisses into the hot cookies.  This recipe is fairy simple, which I appreciate.  No Kellys were burned, cut, or maimed in the making of these cookies (for once).


Peanut Butter Blossoms
Recipe from AllRecipes
  • 1 cup white sugar
  • 1 cup peanut butter
  • 1 egg
  • 18 milk chocolate candy kisses, unwrapped

Directions

  1. Preheat oven to 350 degrees F.
  2. Combine sugar, peanut butter, and egg.
  3. Shape into 1 inch balls and place on ungreased cookie sheet. NOTE: If dough is too sticky, refrigerate 1/2 hour or until easy to handle.
  4. Bake for 10 minutes. Remove cookies from oven. Press a chocolate kiss into the center of each warm cookie.

Friday, November 26, 2010


belated egg nog cake

Friday, November 26, 2010
I am terribly late writing this entry, as I did not particularly care for the cake nor do I feel particularly strongly about egg nog.  I should have seen this apathy coming when I decided to make an egg nog dessert outside of the holiday season.  I love the holidays.  I have created very rigid guidelines about when I can start to enjoy myself about Christmas, otherwise my apartment would be filled with pine boughs all year round and I'd be listening to nothing but Christmas music.  Because that certainly does not happen.

I have been met with a lot of questioning when I have told people about how I made this cake coupled with the fact that I do not like egg nog.  For the record, I made it for someone who does, in fact, like egg nog.  This person has stared longingly at the egg nog in the refrigerated section of the grocery store since it arrived in mid-November (not egg nog season, thank you) and has put up with my scorn for his lack of holiday willpower.  I'm a terrible girlfriend.  To make up for this, I bought egg nog and decided to turn it into a cake.  This also allowed the extra egg nog to be sent home with him at no extra charge.  I am the best girlfriend.

As with all of the recipes that I find, I took a little artistic liberty.  All of the pictures on the website where I got it had it drizzled with custard and nicely shaped.  I drove all over town looking for a bundt pan to no avail, so mine was just a circular blob of cake.  I also didn't know how I felt about custard, so I made my own glaze that I poured over each slice.  I tried sprucing the cake up with some red sprinkles, but they just turned the cake pink over time.  The picture that you see to the left is not my cake, but this is what I want you to imagine my cake looked like.  Pretend it tasted good, too.


Egg Nog Cake
adapted from Allrecipes.com

  • 1 (18.25 ounce) package yellow cake mix (I used butter cake, this may have been a mistake)
  • 2 cups egg nog
  • 2 eggs
  • 1/2 cup butter or margarine, softened
  • 1/2 teaspoon ground nutmeg
In a mixing bowl, combine the first five ingredients. Beat on low until moistened, scraping bowl occasionally. Beat on medium for 2 minutes. Pour into a greased and floured 12-cup fluted tube pan. Bake at 350 degrees F for 40-45 minutes or until a toothpick inserted near the center comes out clean. Cool in pan for 10 minutes; invert onto a wire rack. Remove from pan; cool completely. 

For glaze, combine egg nog with confectioners sugar and a dash of vanilla extract.  Mix with fork until smooth.  Pour over cake if you like mushy cake, as this is not actually a glaze.

Thursday, November 4, 2010


caramel bars

Thursday, November 4, 2010
I have spent the last week and a half* rationing out these caramel bars, and we are down to the final four.  Last night, I sadly wrapped the remainders in tin foil for delivery and spent the rest of the evening going back and forth to the plate with crumbs on it, popping them into my mouth and shamefully ambling back to my bed.  Thank goodness I don't have roommates anymore.

My mother makes these every year for Christmas, and for some reason during the holidays it seems perfectly reasonable to shove handfuls into my mouth.  And one of every other cookie offered.  I think this year I might just cut to the chase and start eating sticks of butter rolled in brown sugar.

*  I know that I'm supposed to do one new recipe every week and I know this is only my second week and I have already failed.  In my defense, I haven't been feeling well and I made three new recipes last week.  If you're interested, I can certainly post the recipe for "half-eaten bowl of cereal" and "cold pitas with hummus."

Caramel Shortbread Squares
  • 2/3 cup butter, softened
  • 1/4 cup white sugar
  • 1 1/4 cups all-purpose flour
  • 1/2 cup butter
  • 1/2 cup packed light brown sugar
  • 2 tablespoons light corn syrup
  • 1/2 cup sweetened condensed milk
  • 1 1/4 cups milk chocolate chips.

1. Preheat oven to 350 degrees F (175 C).2. In a medium bowl, mix together 2/3 cup butter, white sugar, and flour until evenly crumbly. Press into a 9 inch square baking pan. Bake for 20 minutes.
2. After baking, I placed the shortbread into the freezer for about 10-20 minutes to cool.  If you do not do this, the caramel will separate from the shortbread later on.
3. In a 2 quart saucepan, combine 1/2 cup butter, brown sugar, corn syrup, and sweetened condensed milk. Bring to a boil. Continue to boil for 5 minutes. Remove from heat and beat vigorously with a wooden spoon for about 3 minutes. Pour over baked crust. Cool until it begins to firm.
4. Place chocolate in a microwave-safe bowl. Heat for 1 minute, then stir and continue to heat and stir at 20 second intervals until chocolate is melted and smooth. Pour chocolate over the caramel layer and spread evenly to cover completely. Chill. Cut into 1 inch squares. These need to be small because they are so rich.